Export Options Rollout
This rollout was removed in the 0.99 update. All items on this page still exist on the site but have been split up and consolidated with other settings in other rollouts. This page is here only for reference for people using older versions of WWMT.
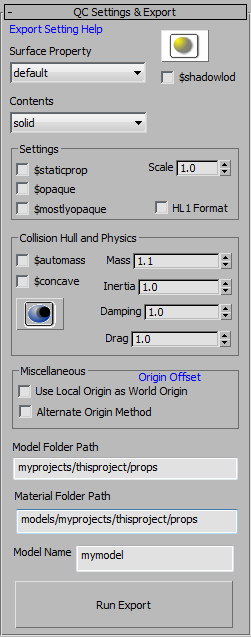
The Export options rollout is where you can control many of the basic settings for your model. WWMT does not include an exhaustive list of all QC command controls. Instead, it provides the most common and basic settings for controlling your model and QC file. Should you need to add options not listed here, you can open the QC file and add them manually.
Export Options
- Illumination Position | $illumposition
-
Clicking this button will select the yellow point helper that controls the $illumposition property of your model. You can then move the yellow helper to a position from which you want the model to be lit.
- As of Version 0.91, the $illumposition may not be set properly unless you have checked the Use Local Origin as World Origin setting. If you do not use the Use Local Origin as World Origin option, the $illumposition may be off if your root model's origin is not at the World Origin.
- See the VDC entry for $illumposition
- Shadow LOD | $shadowlod
-
Check this option to force your model to use the lowest LOD for the shadow. If you do not have LODs for this model, the option is ignored.
- Surface Property | $surfaceprop
-
Use this menu to set the $surfaceprop command for your model. The list here is from Valve's stock props.
The $surfaceprop controls things like the sound emmited from the property during collisions as well as various effects in game.
- When you choose $automass, then the $surfaceprop will be used to calculate the mass of the model.
- According to the VDC, using $surfaceprop in the QC will override the $surfaceprop of a material applied to the model.
- See the VDC entry for $surfaceprop
- Contents | $contents
-
This menu lets you choose the content_type of the model. The default is solid.
- See $contents on VDC
- If your model has a skinned mesh (with bones) then the tool will also create a $joincontents entry for each bone that matches this setting. To make any bone differently, you will have to edit the QC file.
- WWMT only lets you choose one item for the $contents field. The specs allow you to use multiple values... you can do that in the QC after it's generated.
Settings
- Static Prop | $staticprop
-
Setting the $staticprop option will tell the compiler that this model has no animations. All bones will be removed. Note that if you have a Collision Hull, then setting $staticprop will make the QC file use the $collisionmodel QC command; if $staticprop is not set, the QC file will use $collisionjoints instead.
- This setting will stop the exporter from making any Sequence SMDs for this model even if you have added Sequences in the Sequences Rollout.
- See the VDC entry for $staticprop
- Note that in the event of an animated model, do not use $staticprop. Also note that animated Collision Hulls are not currently working in the default QC file that WWMT makes... to make animated Collision Meshes... you will need to manually update the QC file.
- Opaque | $opaque
-
Setting the $opaque option make this model assumed to be opaque in-game. This is a performance setting.
- Mostly Opaque | $mostlyopaque
-
Setting the $mostlyopaque causes the model to be rendered in two passes in-game. It is a performance setting for some kinds of models like trees that have multiple parts--some of which are opaque and others of which are not opaque.
- Since WWMT does not do any QC includes (adding external QCs to the model QC file), you should only set this option if you are also going to manually edit your QC to include the various opaque and non-opaque model pieces.
- See the VDC entry for $mostlyopaque
- Scale | $scale
-
This setting will scale the model by the given float value at compile time (not in the 3ds Max viewport).
- If you want to make a copy of a model for the 3D Skybox that you designed for real-world scale, set the scale to 1/16* (which equates to 0.063 in the Scale Spinner).
- *According to VDC, the scale for L4D is 1/32 (which is 0.031 in the scale spinner).
- See the VDC entry for $scale
Collision Hull and Physics
- Mass Center | $masscenter
-
Click this icon to create a $masscenter point helper (or select the model's $masscenter helper if one was already made). This will create the center of mass for your model. By default, the model's center of mass is at its origin--this will let you move that to an appropriate spot.
- The $masscenter helper is blue by default.
- The $masscenter works on the Collision Model's root mesh, not the root model.
- Like with $illumposition, $masscenter may not work accurately if your model's root collision hull (the first mesh chosen when clicking Pick Collision Model) is not located at the world origin. If this becomes a problem, make sure to click the Use Local Origin as World Origin setting.
- See the VDC entry for $masscenter
- Auto Mass | $automass
-
Click this setting if you want the mass of the model to be determined automatically based on the model's $surfaceprop.
- Clicking this option will override any value entered in the Mass spinner.
- Mass | $mass
-
Manually set the mass of the model in Kilograms.
- Inertia | $inertia
-
Manually set the inertial scale.
- Damping | $damping
-
Manually set the damping scale.
- Drag | $drag
-
Manually set the drag scale.
- Concave | $concave
-
Tells the compiler that the Collision Mesh should be broken up into the individual objects and their Element sub-objects. If not set, the collision mesh objects are converted to a single convex mesh.
- Remember that every mesh in the collision hull must have a smoothing group applied to it.
- If an object in a collision mesh has multiple Element subobjects, each Element must have a unique smoothing group.
- See the Prepare CM utility added in version 0.92.
Miscellaneous
- Use Local Origin as World Origin
-
Use this option to offset the origin of your compiled model in relation to the model's distance from the current Max Scene's world origin. This is necessary if you design in a scene and the model is not located in the world's origin. It may even be necessary if your model is at the world origin but the model's pivot point is not at [0,0,0] .
- Please Note: This feature is still buggy. The results are not always accurate. If you have problems, see the Alternate Origin Method
- This feature may not work properly with custom $illumposition and $masscenter. If you find that the $illumposition and $masscenter are wrong when using this option, please email me the details.
- Alternate Origin Method
-
If you use the Use Local Origin as World Origin method and your model is still not centered in the model viewer, you may want to check the Alternate Origin Method added in Version 0.93 .
- If you try Use Local Origin as World Origin with Alternate Origin on and off, and neither works, you may need to always move your model to the world origin before exporting!
Export Paths and Options
- Model Folder Path
-
Enter the path for this model starting with the folder name that is inside your mod's model folder. For example: if your mod's model folder is located at C:\Program Files (x86)\Steam\steamapps\username\Counter-Strike Source\cstrike\models, enter customfolder/myproject into Model Folder Path to make the model compile to C:\Program Files (x86)\Steam\steamapps\username\Counter-Strike Source\cstrike\models\customfolder\myproject*.
- The field will work regardless of whether you use forward slashes or back slashes.
- The exported SMDs and QCs will go into your Source SDK paths that mirror the mod directories.
- The compiled model will output into the folder given in the example above.
- *If you have checked the Compile Models on Export in the WWMT Settings, the WWMT will run the Valve model compiler when you click the Run Export Button. If the path the model is supposed to compile to does not exist or does not have write permission, the compiler will fail! Using the example above, the complete path:
C:\Program Files (x86)\Steam\steamapps\username\Counter-Strike Source\cstrike\models\customfolder\myproject must be made before you can compile the model.
- Material Folder Path
-
Enter the path for this model's materials starting with the folder name that is inside your mod's material folder. For example: if your mod's material folder is located at C:\Program Files (x86)\Steam\steamapps\username\Counter-Strike Source\cstrike\materials, enter customfolder/myproject into Model Folder Path if your model's texutes (VTS and VMTs) are located at C:\Program Files (x86)\Steam\steamapps\username\Counter-Strike Source\cstrike\materials\customfolder\myproject.
- The field will work regardless of whether you use forward slashes or back slashes.
- Failure to enter the correct path will mean that your model will have no textures in the model viewer or in-game.
- To get your textures to appear in-game, you must convert them to VTFs and VMTs. The tool now has a VTF Texture Exporter in the Utilities Rollout.
- Learn more about using the Texture Exporter.
- HL1 Format
-
This option is only here for allowing you to export the model's SMDs as HL1 format. Note that I have not tested this feature... Use at your own risk. All it does it tell the SMD exporter that the SMDs are targetting the HL1 engine. If working in the Source engine, never click this option.
- Model Name | $modelname
-
Enter the name of this model (with no file extensions). If you enter "MyModelX", then the $body SMD will be MyModelX.smd and the final compiled model will be MyModelX.mdl.
- Do not use spaces!
- Do not use special characters!
- Use only letters, numbers and underscore.
- WWMT does not do any error checking for the name of the file!
- Run Export
-
Click this button when you are ready to run the exporter. Below is what happens:
- WWMT makes a QC file based on the settings in WWMT.
- WWMT exports all SMDs into your Export Path (which is controlled by the WWMT Export Option: Model Root and this model's Model Folder Path).
- If you have entered the Bin Directory, WWMT writes a Batch file into the same director as your QC file that will run the compiler for your QC.
- If Compile Models on Export is turned on and you have entered the Bin Directory, WWMT will run the compiler batch file. If Steam is running and the destination folder (compiled model target folder) exists, you should now be able to load your model in the model viewer.